The LKS Address

Welcome to Our Home Address

  • BLOG
  • SHOP
  • YOUTUBE
  • ABOUT
  • CONTACT

EXPLORE

  • BLOG
  • SHOP
  • YOUTUBE
  • ABOUT
  • CONTACT

Connect

RENOVATION · March 23, 2022

UPGRADING OUR STAIR FROM CARPET TO WOOD FLOORING

Our first major project in the new house was upgrading our existing stair from blue carpet to wood flooring, something that will much better match our future aesthetic throughout. This was quite the undertaking, Kam and I had no idea what we were getting ourselves into when we started the project. We’ll briefly walk through the steps we took and of course include details on all of the products we used to complete the upgrade.

We first started the project with the obvious – removing the existing carpet. We had previously peaked under the carpet to see what we were working with underneath and to no surprise we did not have finish treads or risers.

With no finish treads or risers, this meant we’d be installing a new finish layer on top of the existing. Before we get to that, we needed to square off the existing treads. As is, they had about a 1″ overhang, but we wanted our new finish layer to be the only overhang you’d see, so we would trim up the existing sub-treads. In order to do this, we felt most comfortable using our jig saw to notch in 1″ increments and then followed up with a hammer and chisel to chip off the overhang.

Once that was done, we could start to think about getting all of the new material and begin fitting it to size. A quick disclaimer though – because we know we are ultimately painting our entire stair, mixing and matching wood species of our new material did not matter to us. If you’re staining, it’s much more important for a consistent look. For the new finish materials we used these treads and these risers from Home Depot.

At the stair landings, things get more complicated, so for that area we used sheets of 3/4″ sanded plywood with this landing tread, this way all of the stairs have the same nosing and profile. At the landing we also opted to use 1×6 pine boards cut to size to act as our baseboard, which we coordinated with the skirts on each end.

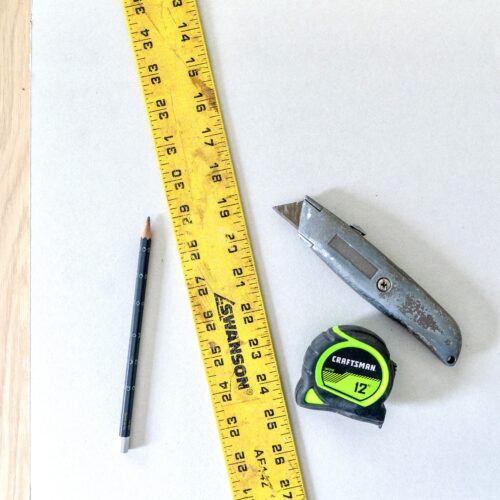
As for the tools we needed to get all of our material fit and cut to size, we utilized our table saw, mitre saw, and circular saw. We only needed the circular saw to cut our angled landing pieces, so if you do not have an angled landing like us you probably won’t need one.

Once we got all of the material cut, we dry fit the entire stair. I really like doing this because one, it is great to see all of the progress you’ve made and two, it ensures you’ve got all of the pieces done and they fit correctly.

For installation, we opted to use Loctite PL Premium as our adhesive. We applied very liberal amounts of adhesive to the backside of the treads / risers and once in place we lightly tapped a mallet across each of the pieces to ensure adhesion. Lastly, we used our brad nailer with 2 nails on each end of the tread or riser. Because we needed to continue to walk up and down our stairs while the adhesive cured, we installed the treads on every other stair and waited 24 hours before installing the second half. Once every piece of the new stair was installed, we filled all of the nail holes with wood putty and caulked any gaps with DAP Alex Flexible Caulk.

Although this project was a ton of work, it was totally worth it. We’re so happy with the finished product and its a cost-effective impact you can make in your house. If we would have finished the stair with the new engineered hardwood we’re planning to use it would have been thousands more with this method. Stay tuned for an additional blog post on what we used to paint the entire stair and of course, a full foyer reveal!

Shop all of the products used for this stair project:

Posted By: thelksaddress · In: RENOVATION

OUR FOYER DESIGN PLAN
PAINTING OUR STAIR BLACK & WHITE

You’ll Also Love

FRAMING OVER OUR EXISTING BRICK FIREPLACE
STAINING OUR WOOD WINDOWS BLACK
PAINTING OUR INTERIOR WOOD DOORS
About Photo
Hi! We are Lauren and Kameron, the creators behind the LKS Address. Together, we are working to pursue our passions of design, renovation, and architecture.

EXPLORE

  • BLOG
  • SHOP
  • YOUTUBE
  • ABOUT
  • CONTACT

thelksaddress

Let’s build some doors for these bookcases! It’s not a library door unless it has a brass grille, so we couldn’t forget those. We weren’t sure if we’d do doors or not and the build would have been much simpler without them. But we’re glad all of you pushed us to do the doors because we love how they turned out!
°
°
°
°
#LKSAddress #homelibrary #billybookcase #library #ikeahack #darkgreen
Elevating IKEA is one of our favorite things to do Elevating IKEA is one of our favorite things to do and we’re so excited about finishing up the library bookcases! We’ve made it through assembling the Billy bookshelves, rough framing, building our face frame, painting, adding inset detail trim, and installing our picture lights. We’ve only got a few things left to complete, and up next are our semi-custom brass grille doors!
°
°
°
°
#LKSAddress #homelibrary #billybookcase #library #ikeahack #darkgreen
Kam and I have been talking about going to Paris f Kam and I have been talking about going to Paris for years, we finally made it a priority and went to Paris for a week in October! We immediately fell in love with the city and it’s probably my favorite city I have ever visited. We left feeling so inspired. I cannot wait to go back and learn more about Parisian culture. If you’ve been to Paris, tell us your favorite part. If you haven’t been, we’d love to hear one reason you can’t wait to visit!

Paris Highlights:
@jacquemartandre - beautiful house museum
@copains.paris - gluten-free bakery
@veuveclicquot - touring their champagne house
@jentemple - special thanks to Jen for helping start our research with a bunch of personal recommendations!
°
°
°
°
#LKSAddress #Paris #France
Our backyard has undergone quite the transformatio Our backyard has undergone quite the transformation over the past year! From removing our existing deck, pouring a new concrete patio, overhauling the landscaping, installing raised garden beds, and adding finishing touches like our centerpiece urn and outdoor furniture; we wouldn’t have it any other way! It’s truly feels like an extension of our home now. It’s so nice that now when we look outside it just feels like us. What is your favorite part of our backyard project?
°
°
°
°
#LKSAddress #outdoorfurniture #backyardmakeover #outdoorrenovation
Our backyard project is now complete thanks to the Our backyard project is now complete thanks to the finishing touch, our new outdoor furniture. This outdoor furniture from @liveouter is beautiful yet functional and helps to create an extension of our home outdoors. #sponsored

We went with the Charcoal Aluminum Sofa with Armless Chairs 5-seat set and paired that with the new centerpiece of our patio, the OuterStone fire pit. Our favorite part about the seating set is the integral covers, the OuterShell, that will protect our cushions for seasons to come. It makes covering and protecting our new furniture easy and convenient! Have you ever seen anything else like it?
°
°
°
°
#LKSAddress #outdoorfurniture #outdoorliving
Before and after at our front door and covered ent Before and after at our front door and covered entry! This used to be the most disliked part of our exterior. We wanted to lean into traditional elements here to coordinate with our colonial style exterior as we gave it an updated look. Now it feels cohesive with the exterior and our personal style. Special thanks to our partners on this project, @pookylightsus, @peasedoors, and @levelhome. 
°
°
°
°
#LKSAddress #frontdoor #coveredentry #doorhardware
Follow on Instagram

Copyright © 2025 The LKS Address · Theme by 17th Avenue