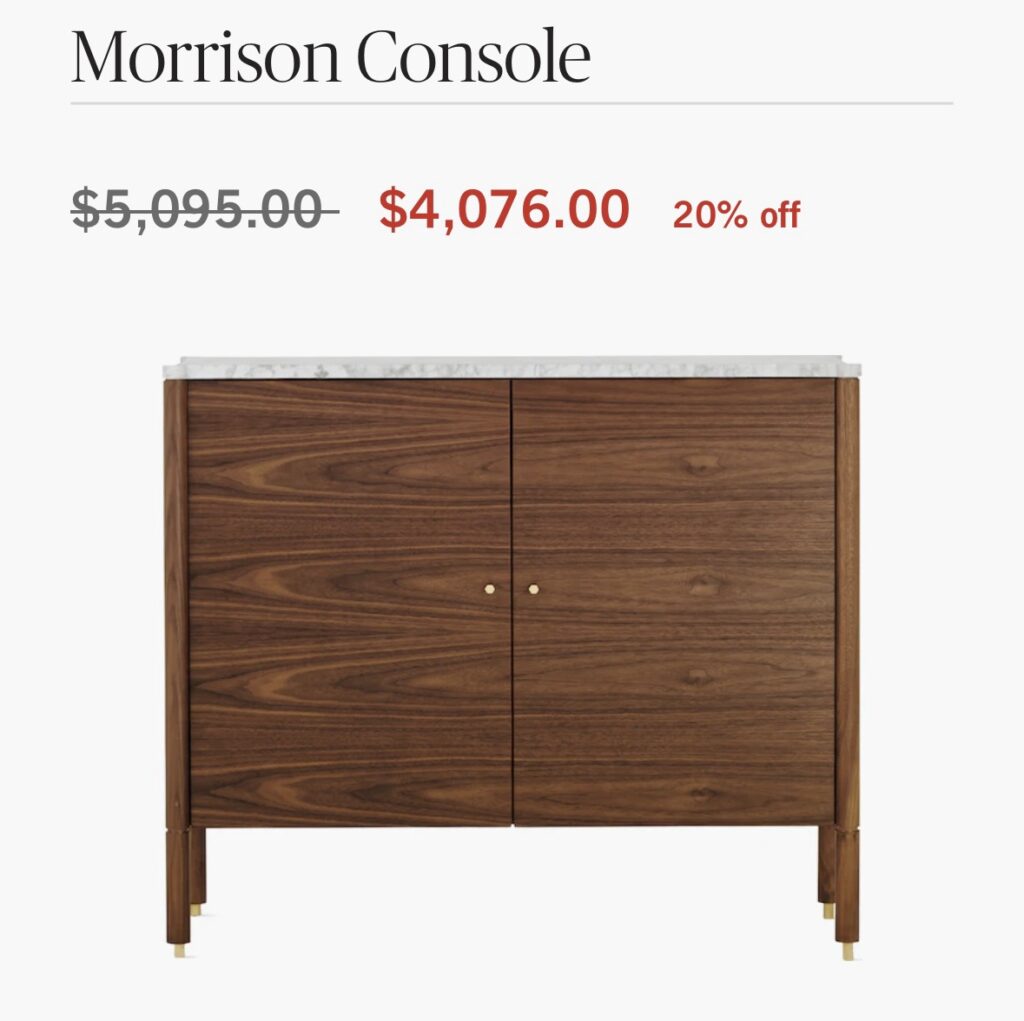
We’re building DIY walnut storage cabinets from scratch! We saved $9,000 by DIYing designer after we fell in love with the Morrison Console from Design Within Reach. We built these cabinets using pocket holes and readily available materials for around $500 each.
THIS PAGE MAY CONTAIN AFFILIATE LINKS FROM WHICH I RECEIVE A SMALL COMMISSION.
Cabinet Inspiration & Design
We fell in love with the Morrison Console from Design Within Reach. However, these cabinets retail for $5,000 EACH! Although we’ve never built furniture before, I immediately knew we’d tackle this as a DIY. After lots of research on materials and how to construct the cabinet, I designed and planned out our build. The best part about building this from scratch? We customized the sizing to best fit our exact space.
Wood & Materials
Our goal for these DIY walnut storage cabinets was “KISS”, “keep it simple stupid”. We challenged ourselves to use readily available materials so they could be easily replicated if others wanted to build it themselves too. For all of the walnut materials listed below, we purchased them from a local lumber store.
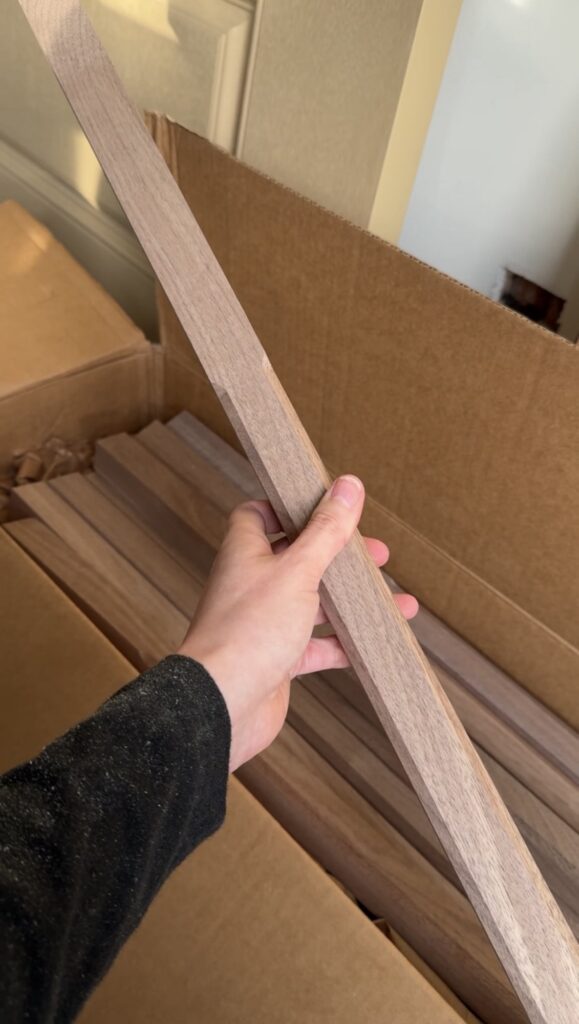
- 3/4″ 2-sided Walnut Plywood – for a majority of the cabinet. We opted for 2-sided walnut Ply so that the inside of the cabinet was also walnut
- 1/4″ 1-sided Walnut Plywood – for the back of the cabinet
- 1×3 Walnut Boards – for the border at the tops of the cabinet
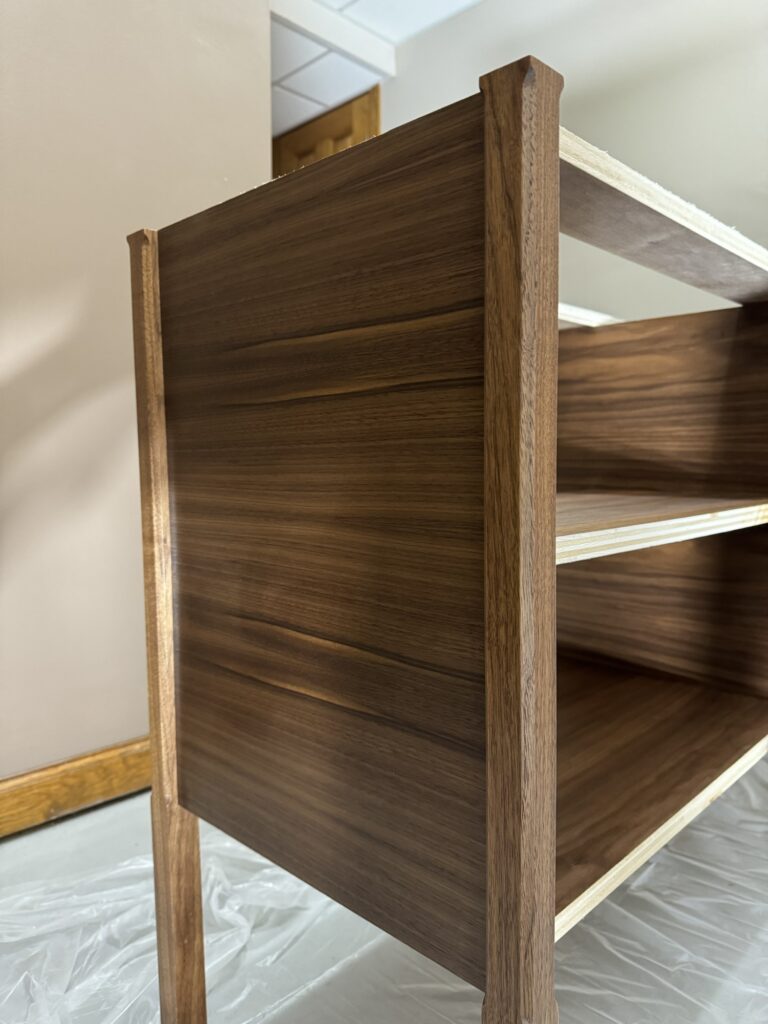
- 1-1/4″ Walnut Chamfered Square Wood Baluster (38″ L) – for the legs
- 3/4″ Walnut Edge Banding
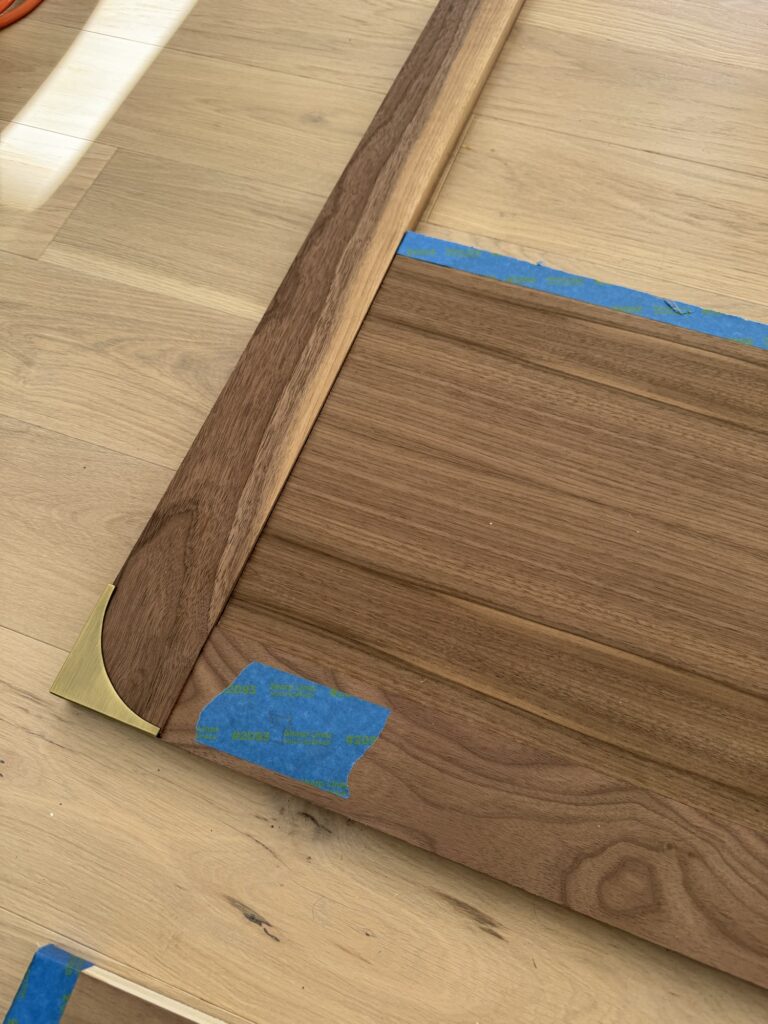
- 1″ Brass Feet – for the cabinet feet
- Blum Full Overlay Door Hinges – for the door hinges (mounting plate sold separately!)
- Blum Clip Top Mounting Plate – for the door hinges
- Portland Flat Top Knob – for the door hardware (use code “LKS” for 15% off your order)
- Kreg Pocket Hole Jig 320 – to assemble the cabinet with pocket holes
- Pocket Hole Screws – pocket screws for 3/4″ material
- Wood Glue
- Dewalt 50″ Clamps
Building the Cabinet Frame
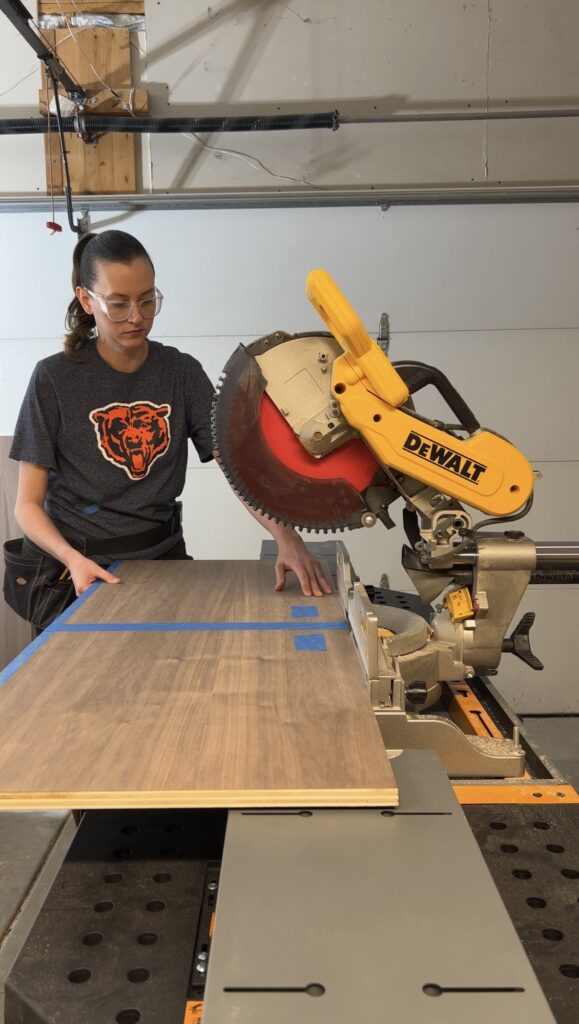
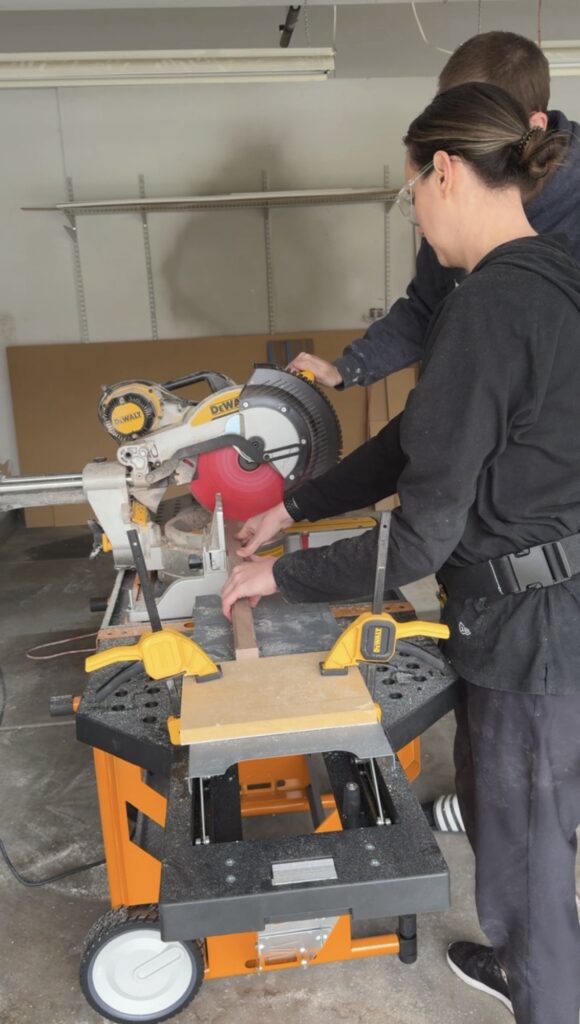
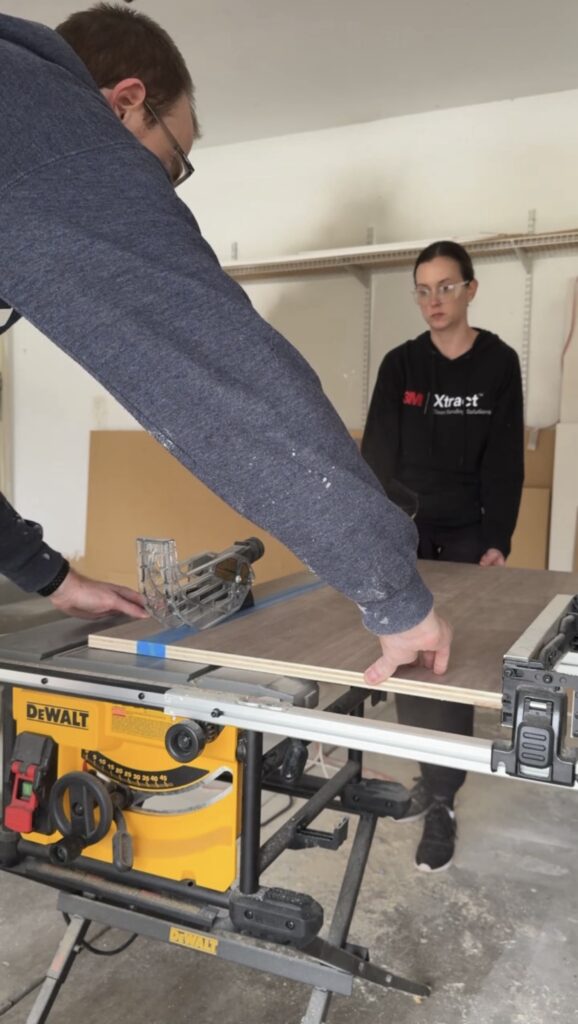
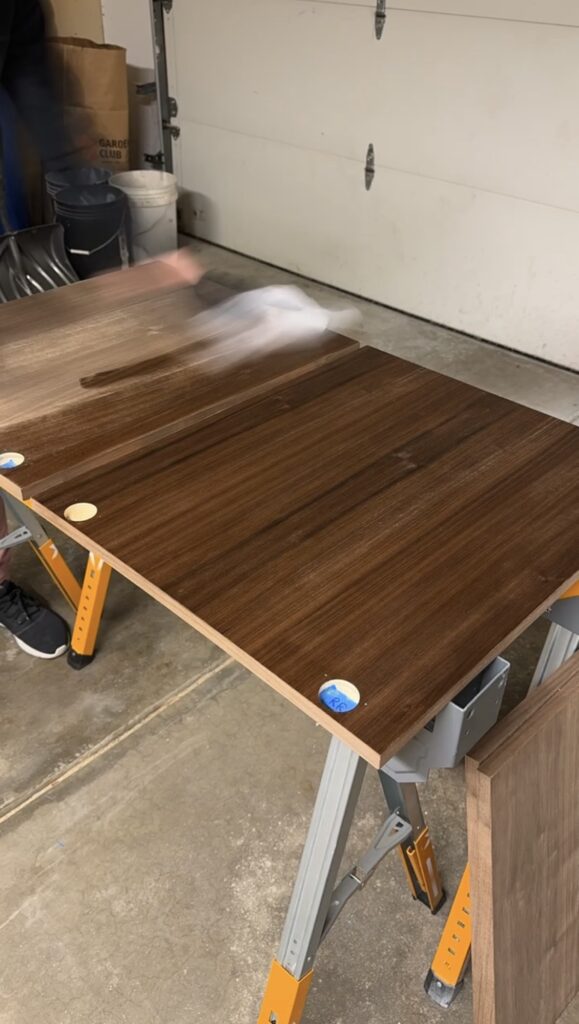
Now that we have the materials, we first started by building the cabinet frame. We started with the sides and bottom of the cabinets. For both of these we’re using the 3/4″ 2-sided walnut plywood. We measured out all of our pieces and before cutting, we applied painters tape to help limit any damage to the walnut veneer while cutting. We’re not sure if this actually helped, but it was worth the effort to try to keep the veneer as perfect as possible.
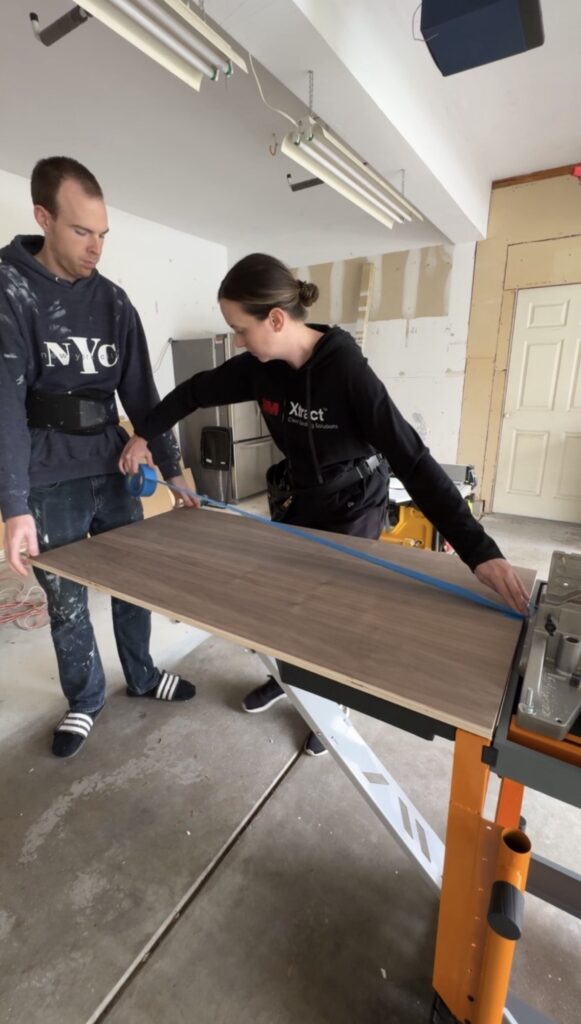
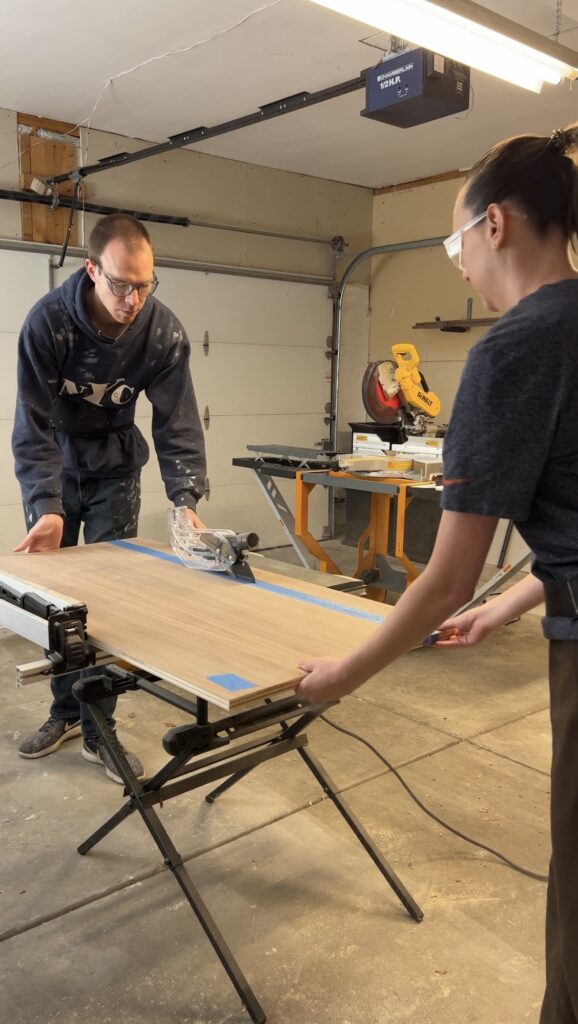
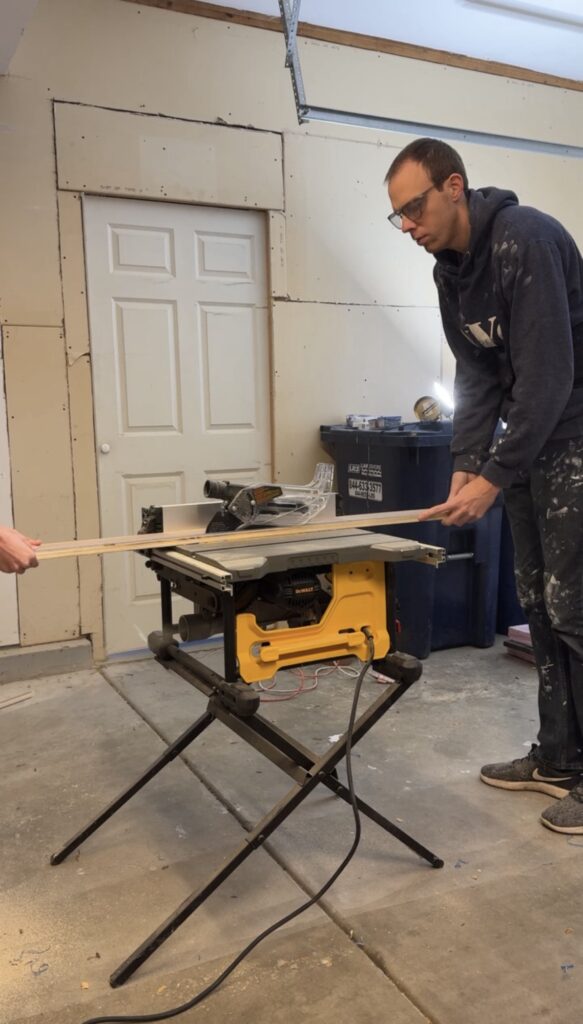
For all of the cuts at the bottom and sides, we ripped down the pieces using our table saw first. After that, we made any additional cuts using our mitre saw. We’re building 2 matching cabinets so we cut two bottoms and four sides.
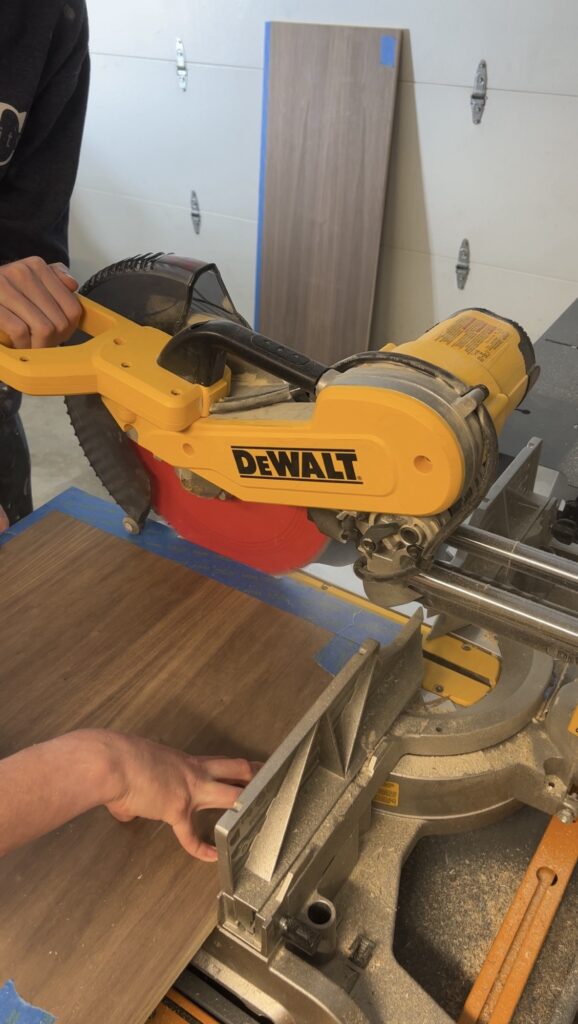
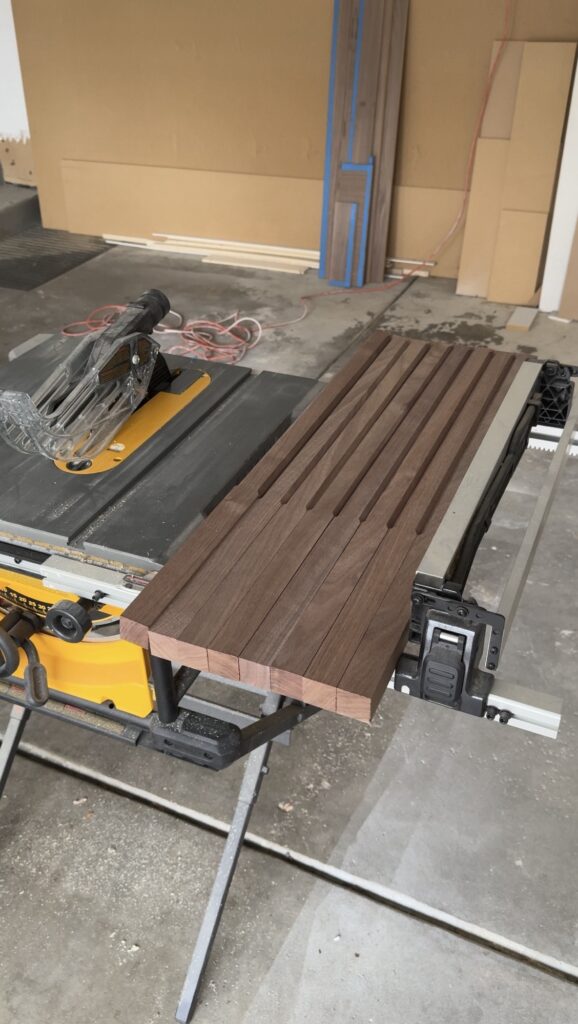
We also needed to cut two braces the top of each cabinet for support, since we wont be attaching our top until the very end. We ripped these down into 3-1/2″ strips so that they are wide enough for two pocket holes. We’re using 3/4″ 2-sided walnut plywood scraps for these.
We needed two of these for each cabinet, so for both, we’re cutting four bracing strips.
Cabinet Legs
The aspect of our DIY walnut storage cabinets that took the most research was the legs. We wanted a simple, off-the-shelf solution for the legs and luckily I came across these walnut stair balusters. We used the 1-1/4″ wide by 38″ L balusters in walnut.
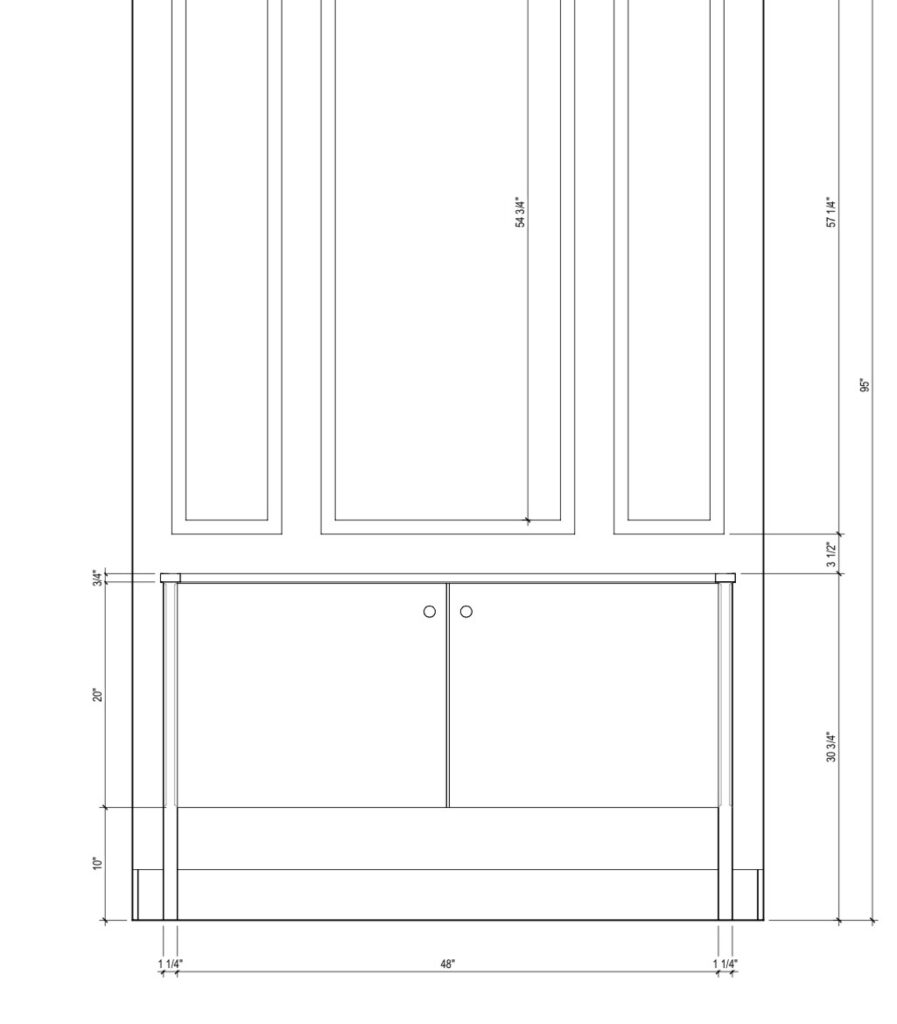
We opted for the 38″ length so that we could be very intentional about where the chamfered area met the cabinet. We cut these down to size so that we had 20″ of chamfered length at the top of the leg (which will align with the 20″ tall doors later). That left 10″ of squared length at the bottom (where the cabinet will be open).
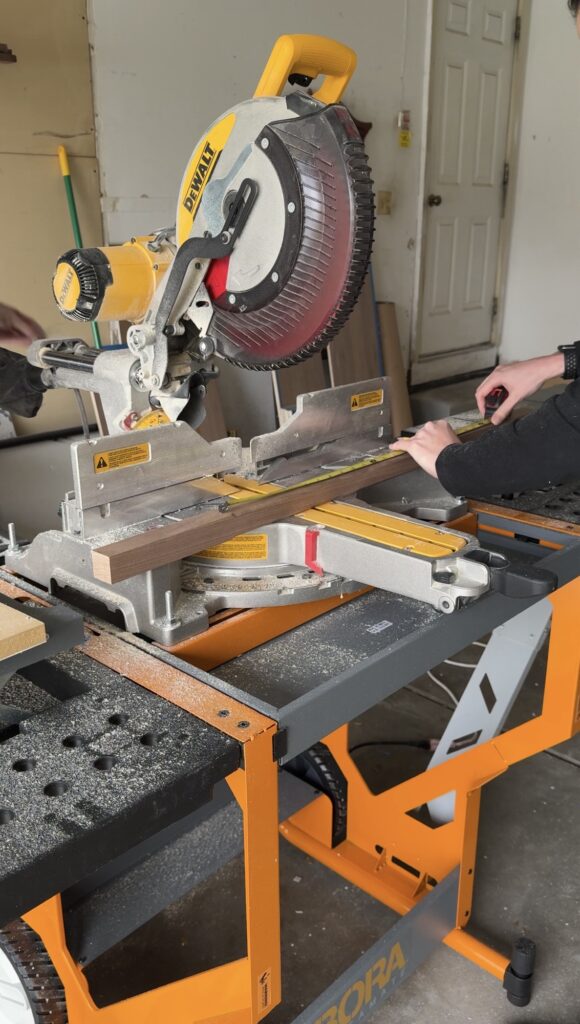
We measured and cut these down to size. We used a stop-block (a piece of wood clamped to our mitre saw stand) so that each piece was cut to the same exact length. This allowed us to measure only once and then use the stop-block for the remaining legs.
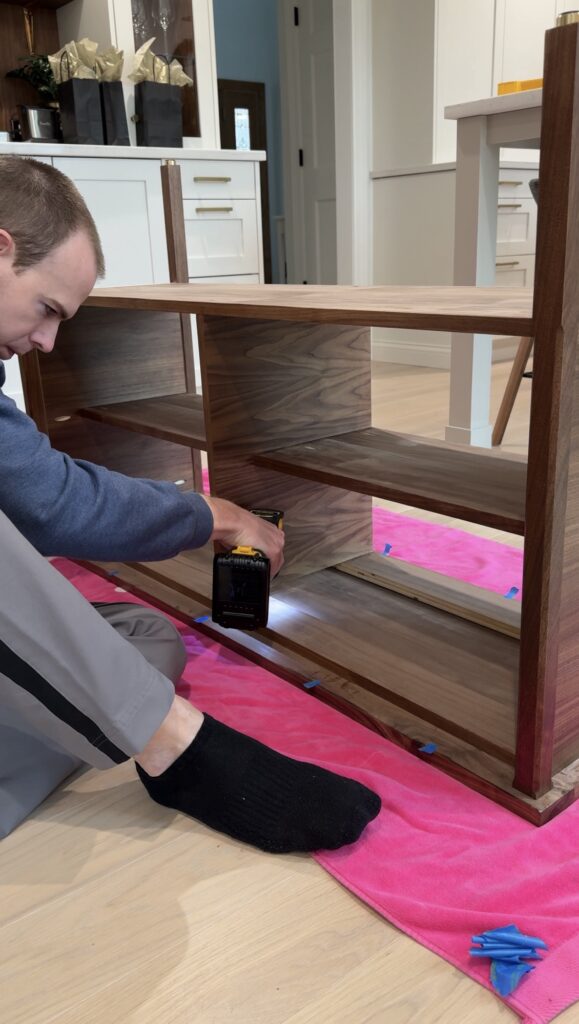
Using Pocket Holes for Assembly
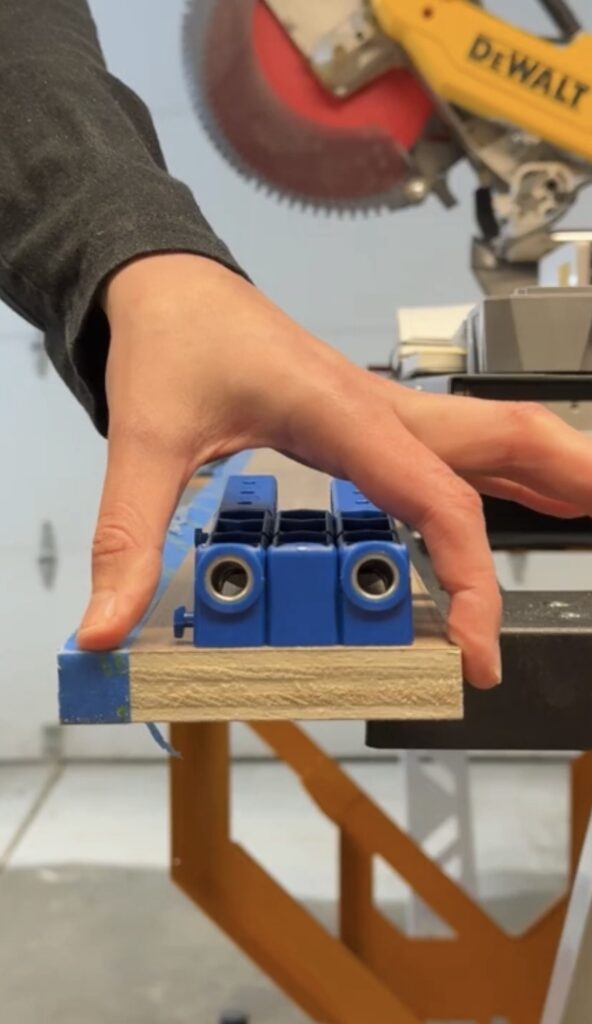
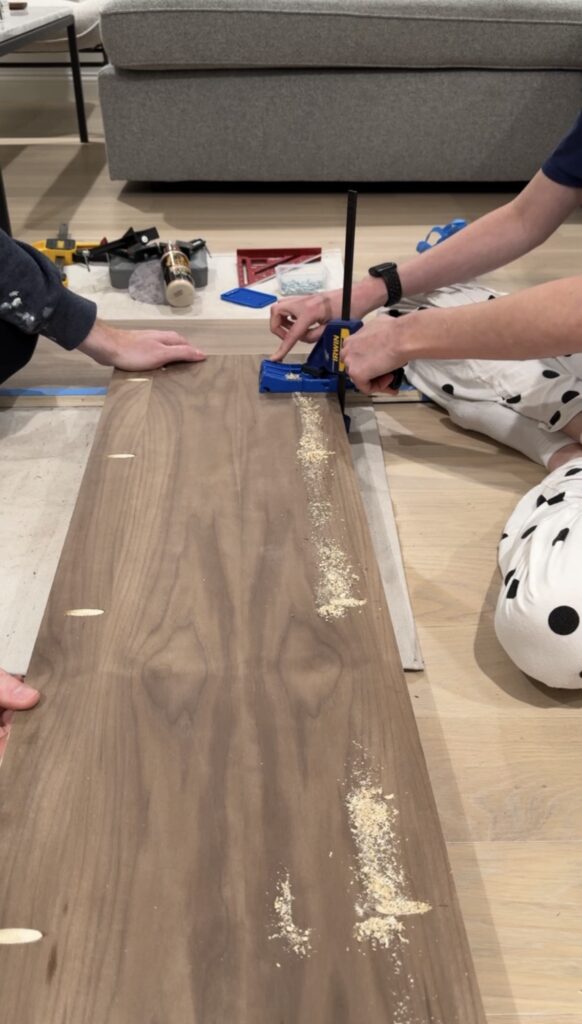
We also wanted to make the assembly of these cabinets as easy as possible. We did not want to create any complex joints that required special wood working tools. We opted to use pocket holes for assembly across the entire cabinet. Surprise, we also have never used pocket holes before! We purchased the Kreg Pocket-Hole Jig 320.
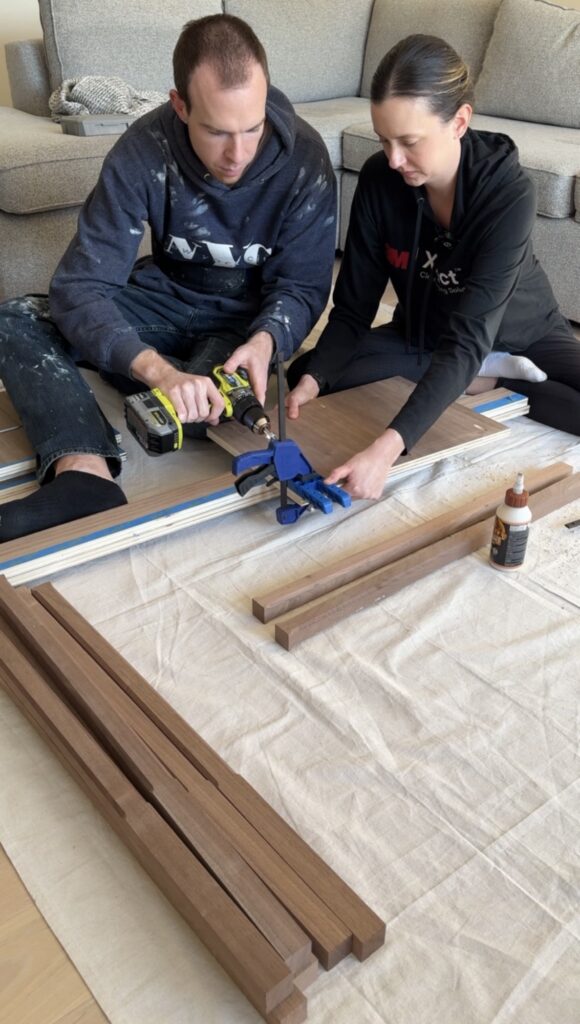
We drilled three pocket holes into each side of every piece, so six pocket holes in each piece total. The trick with pocket holes is to make sure you’re drilling the holes into the inside of the piece, so they’re not visible from the outside of the cabinet.
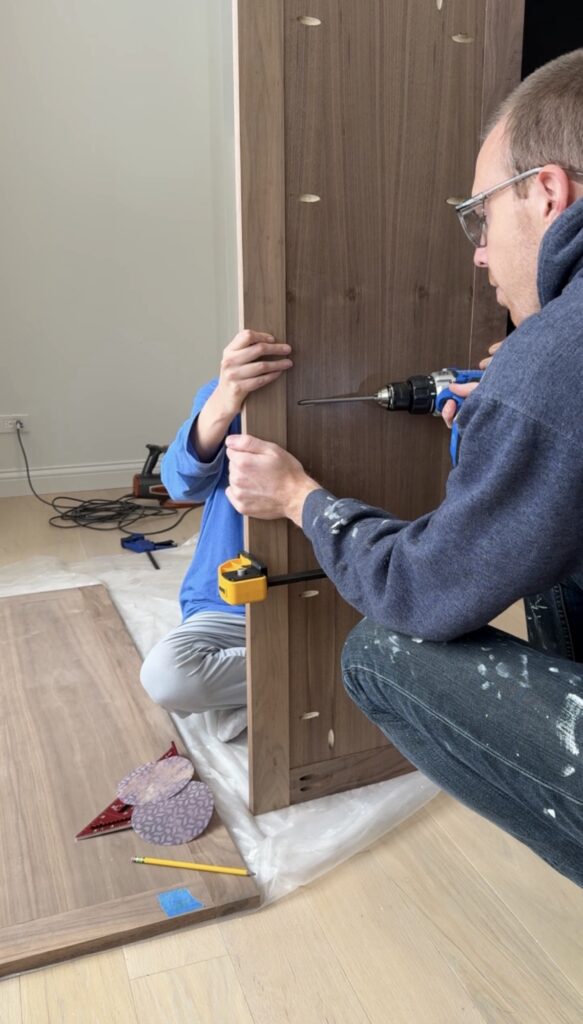
After we had all of the pocket holes drilled we were ready to start assembling the sides of the cabinet. We applied wood glue to each side panel that would meet the walnut legs. We also used a scrap piece to prop up the side panel so it was flush with the legs. We then used clamps to hold everything tight and applied the screws into each pocket hole.
Edge Banding Plywood Edges
Before we assembled the overall cabinet, we needed to apply edge banding to any exposed plywood edges. This occurred at the front of the bottom and top (support) edges.
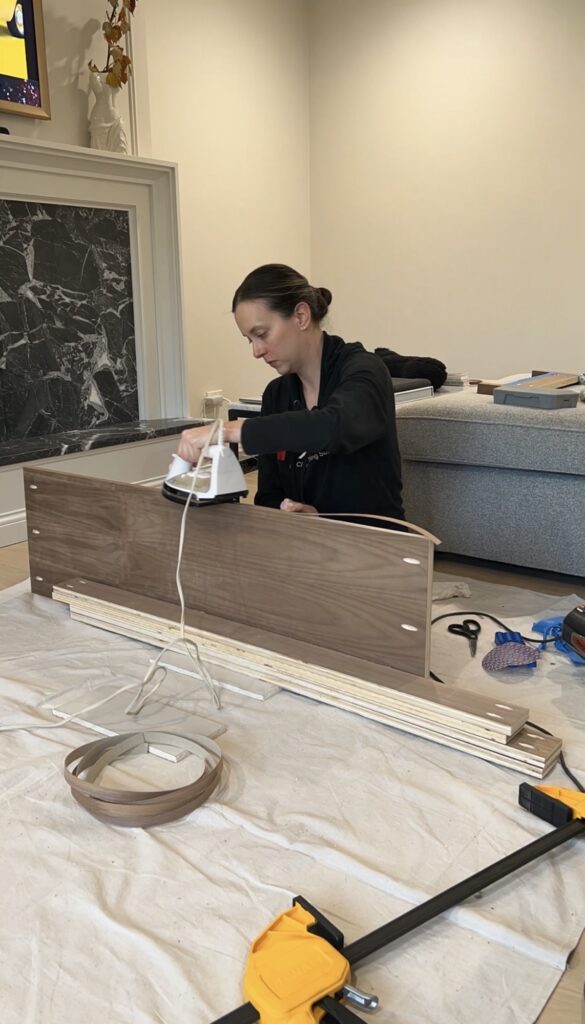
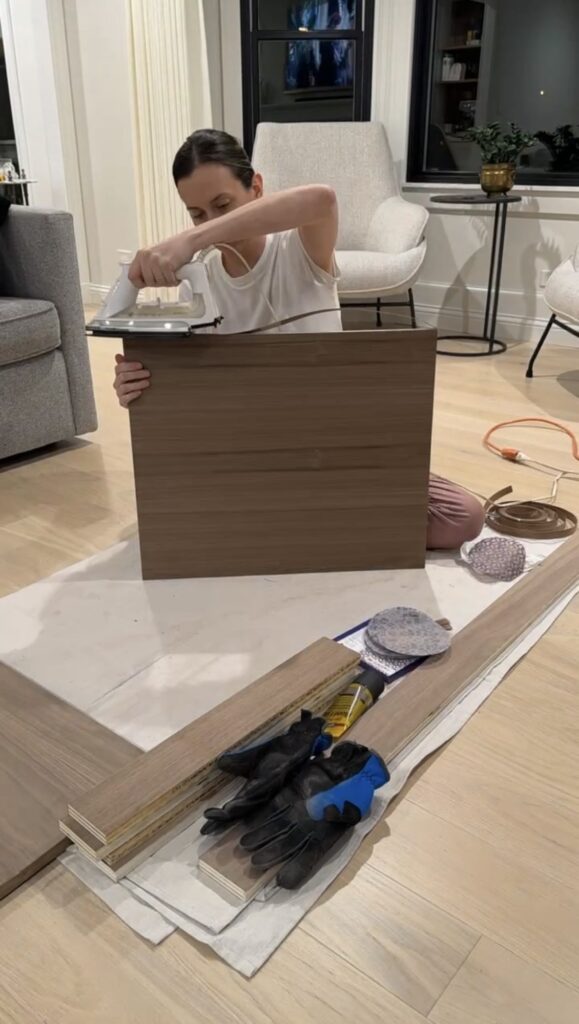
We used a 3/4″ walnut edge banding. Most of the time it is recommended to go up a size from the thickness of material you are edge banding, however, I personally find it easiest to get the same size as the material. We apply it using an iron (we order pre-glued edge banding) and then sand off any excess.
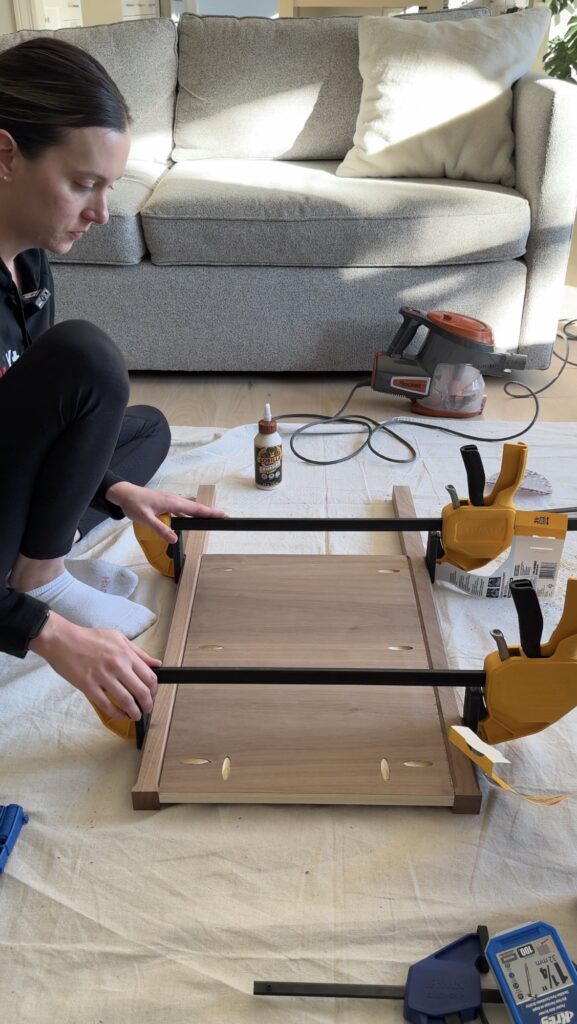
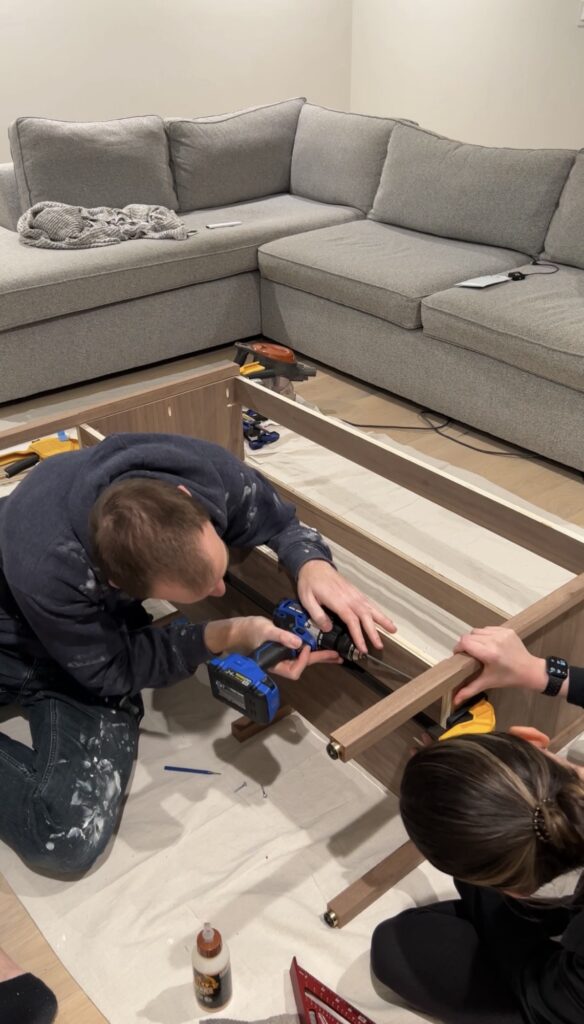
Assembling the Cabinet Frame
After the sides of the cabinets and legs were assembled, we attached the brass feet. We were then ready to assemble the rest of the cabinet frame. When assembling the overall cabinet, these extra large 50″ clamps came in handy. It would have been really difficult to hold the cabinet together tightly without these!

Building the Cabinet Doors
Once we had the cabinet frames full assembled, we were able to measure and cut the cabinet doors. We probably could have done this when we initially cut all of the wood, but we wanted to make sure we were working with correct and accurate measurements.
When measuring for the cabinet door size, the door will typically be 1/8″ less than the opening. For example, our opening was 48″ W x 20″ H and we needed 2 doors, so our doors were 23 7/8″ W x 19 7/8″ H. Our doors ended up being a little tighter than we liked because we did not account for the thickness of the edge banding to be added to all 4 sides after. If we did it again we’d deduct another 1/16″ from each door size to account for that.
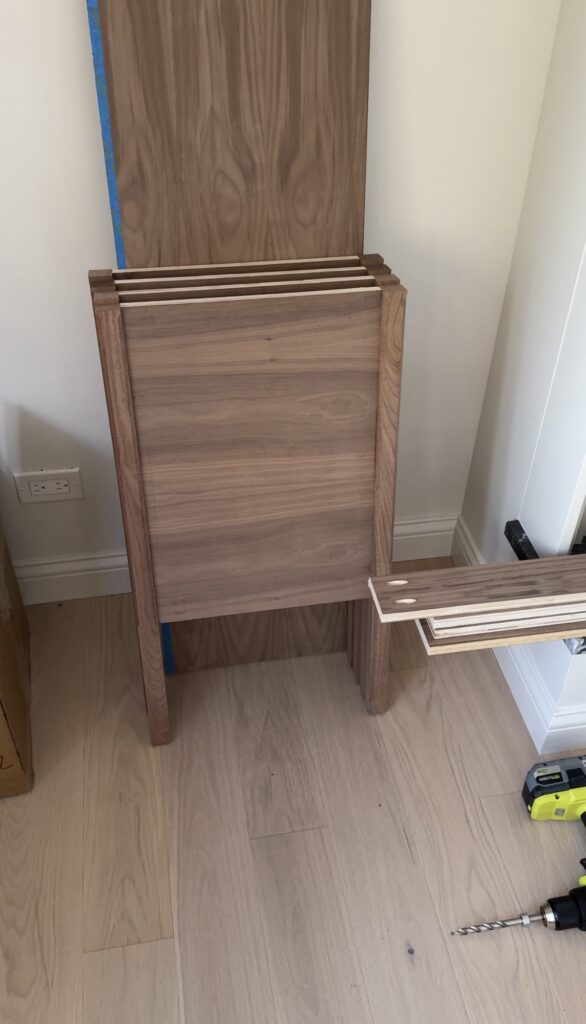
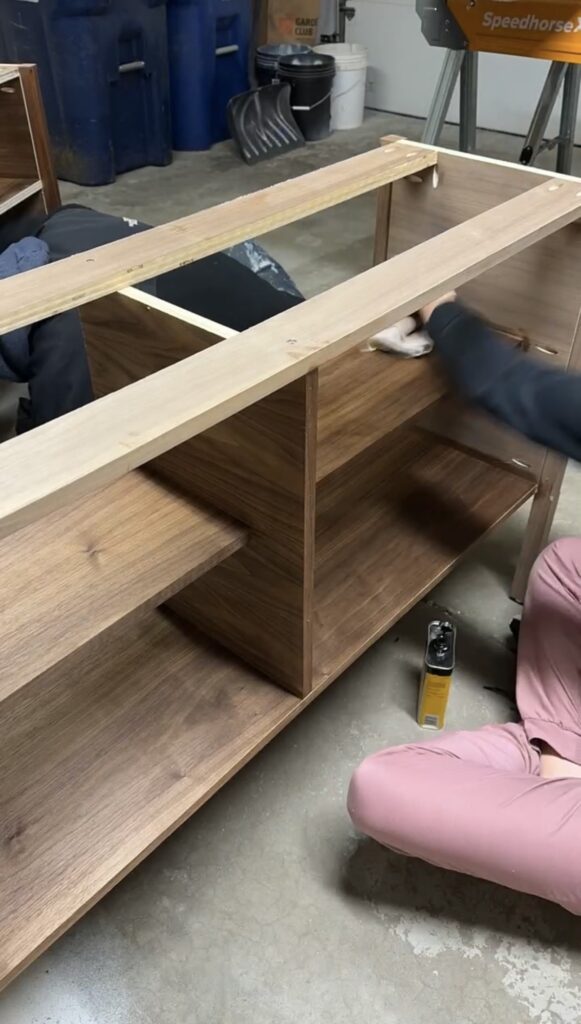
Installing the Shelves
This wasn’t part of the original plan but after seeing the cabinet box we decided to add shelves inside. We also decided that adding a full-height center brace could be a good idea to help reinforce the cabinet and any potential sagging at the center.

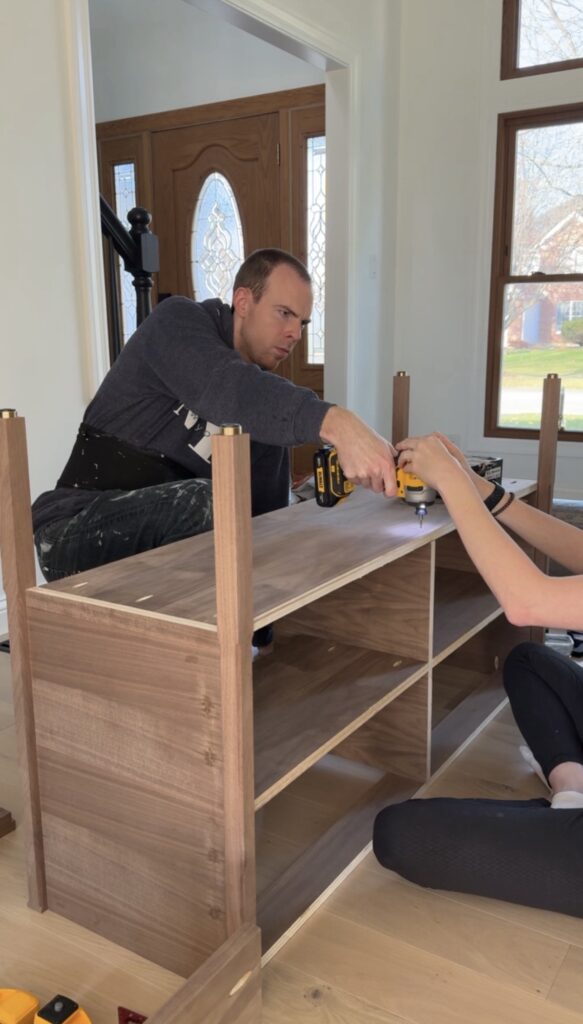
We measured, cut, edge-banded, and drilled pocket holes into these just like every other piece so far. We attached via pocket holes on the underside of each shelf. For the center brace, we drilled it in from the top braces and bottoms of the cabinet.
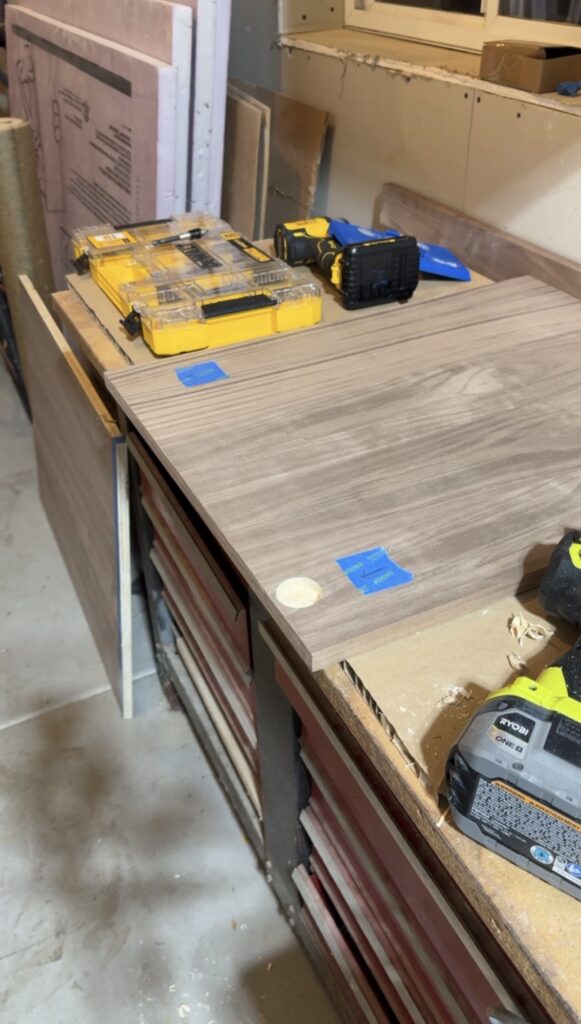
Building the Cabinet Top
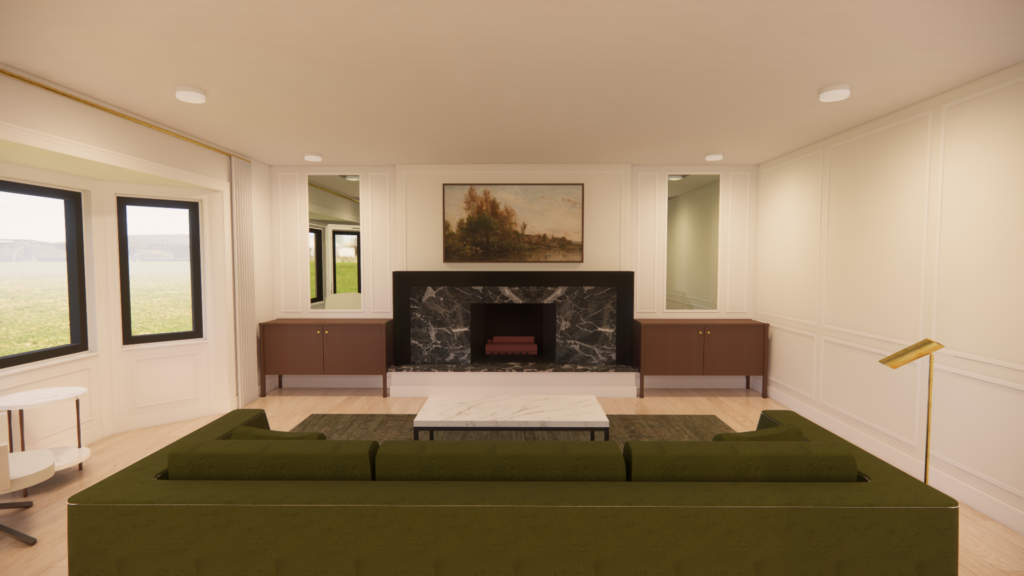
We haven’t yet talked about what we planned for the cabinet top. Our inspiration cabinet had a marble top. We recently made over our fireplace with stone, which you can check out here! We decided we did not want a marble top on the cabinets competing with the fireplace so we opted for wood tops.
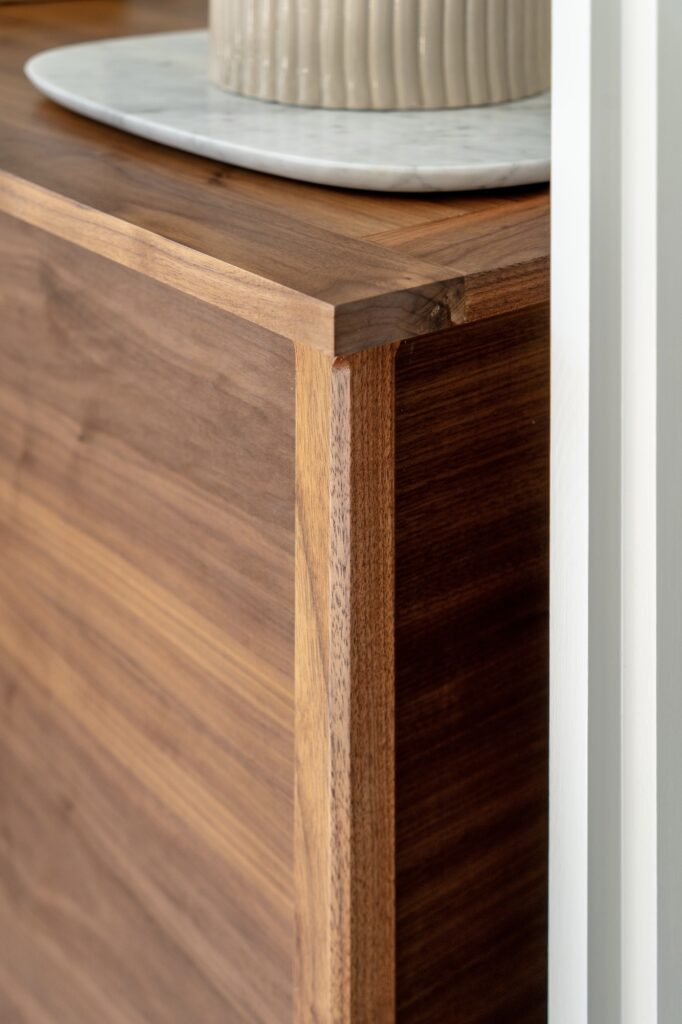
We wanted to use sole solid walnut for the top to give it a higher end look. However, you could definitely use a simple piece of the walnut plywood and edge band all 4 sides to keep it simple. To incorporate solid walnut, we picked up walnut 1x3s from our local lumber yard. We’ll use these as a border around the center of the top.
We measured our overall cabinet top size, including a 1/2” overhang at the legs on all 4 sides. We then subtracted 2-1/2” from each side to account for the 1×3 border.
We drilled pocket holes to the underside of the top and the sides of the 1×3 border pieces. We applied wood glue, clamped the 1x3s to the plywood, and attached with pocket screws.

Our border turned out really well after we attached it to the plywood, but there were minor imperfections. I sanded down the border to make it flush using 220-grit sand paper and our orbital sander. It’s important to be very careful when sanding because you do not want to sand through the walnut veneer
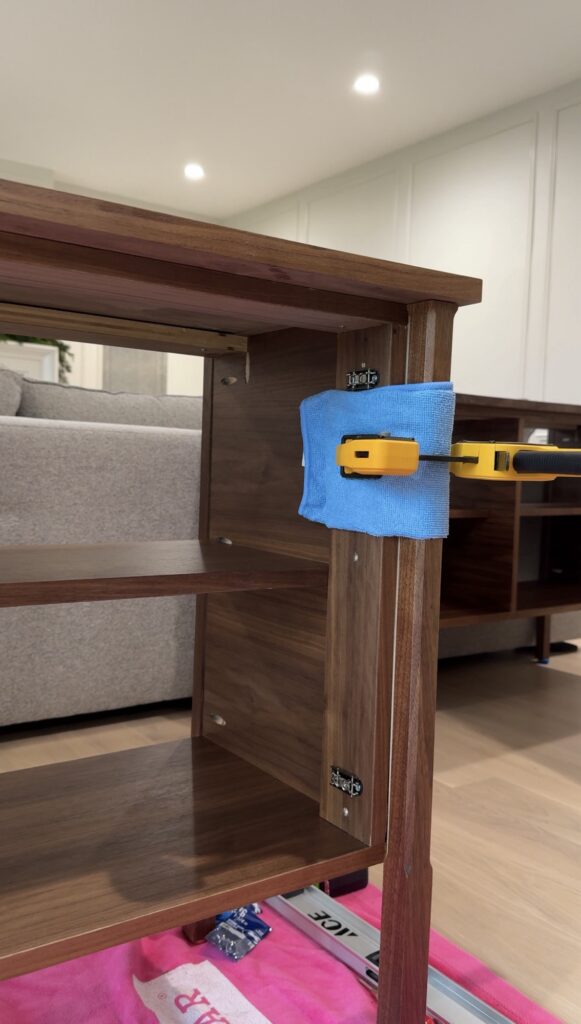
Drilling the Cabinet Door Hinges
Now that the cabinets are fully assembled and all pieces are ready for finish, we’ve got one last step to do.

Before applying the finish we used the Kreg concealed hinge jig to cut the holes for our cabinet door hinges. For hinges, we’re using the same Blum door hardware found in our IKEA kitchen (Blum Full Overlay Door Hinges and Blum Clip Top Mounting Plate)
Finishing the Cabinet with Tung Oil & Poly
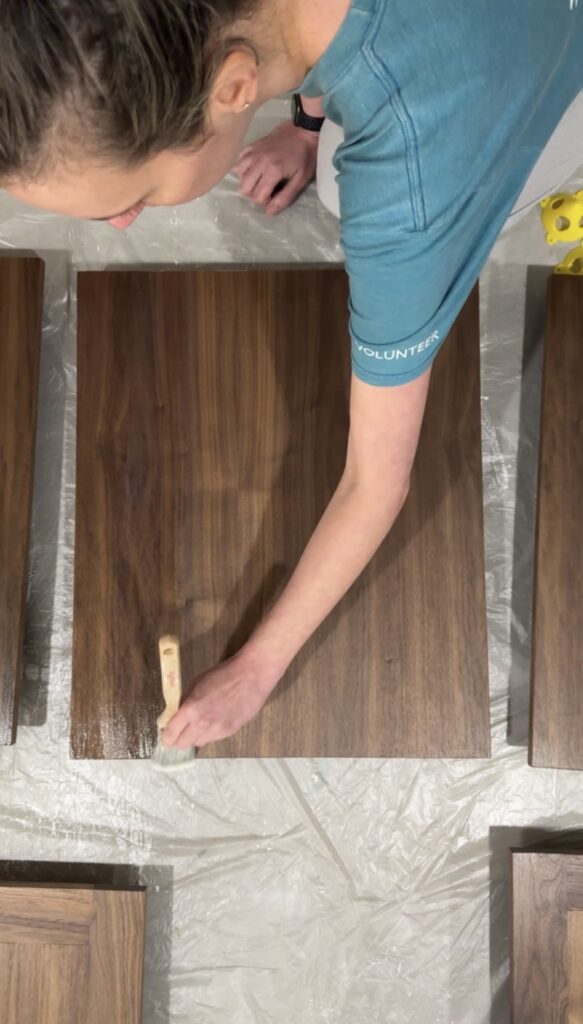
It’s taken a bit to get here, but we’re finally at one of the finishing steps of this cabinet build. We previously incorporated walnut into our kitchen coffee bar, which you can check out here. At our coffee bar, we finished the walnut veneer with tung oil. We love the natural but saturated look so we’ll be doing the same on these cabinets!

Before applying the tung oil we lightly sanded everything down with 220-grit sand paper. We then wiped with a tack cloth before applying any finish.
Tung oil is super easy to apply which is one of the main reasons we like to use it. You simply wipe the tung oil onto the wood with a lint free cloth and wipe off any access. Once you apply the tung oil, you’ll start to see the walnut veneer come to life! We applied one coat of tung oil to all of our cabinet pieces: the frame, the doors, the top, etc.
After the one coat of tung oil set for at least 24 hours, we were ready for topcoat. We are applying a topcoat of satin polycrylic to these cabinets for extra durability. We first started by trying out spray poly, which did not go well. In the end, we ended up using brush-on poly and it provided the finish we were looking for. We brushed on 2-3 coats of poly and did a light sand with 320-grit sandpaper in between each coat.
Once we finished multiple coats of poly, we made sure to let the cabinet cure for at least 24 hours. After that, we’re FINALLY ready for final assembly!
Final Cabinet Assembly
Now it’s time for final assembly for all our cabinet pieces. The first thing we did was to screw on the cabinet tops. We flipped the cabinets over onto the top. We used 1-1/4″ screws to attach it into place. After that, we attached the mounting plate for the hinges, to the sides of each cabinet. We used the same 1-1/4″ screws for this.
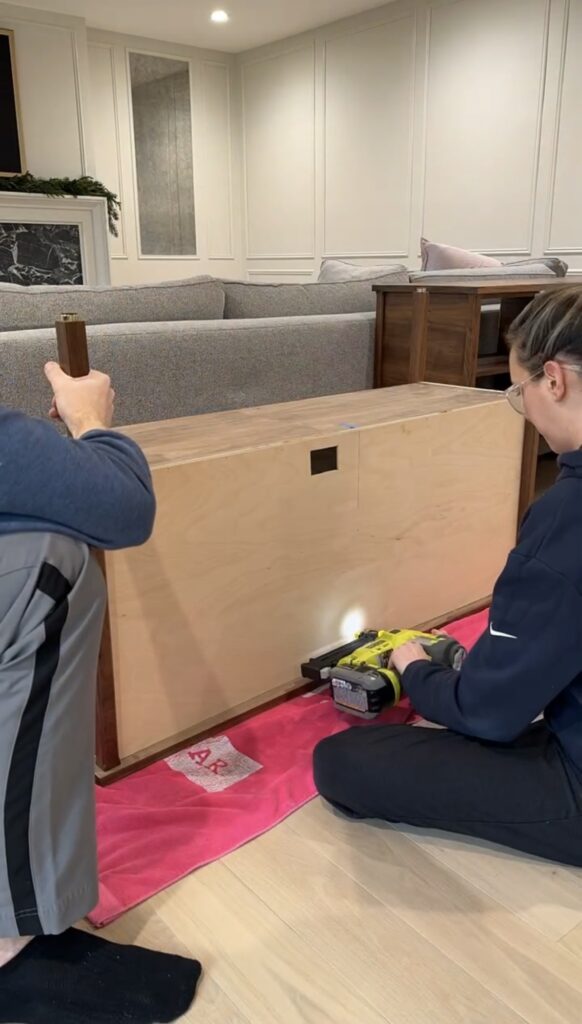
Then we attached the hinges to the cabinet doors. We used 3/4″ screws for this. Once that was complete, we nailed on the back. We measured and marked out where the center brace and shelves were, so we knew exactly where to nail. We used our brad nailer to attach the back but you could also use screws if needed.
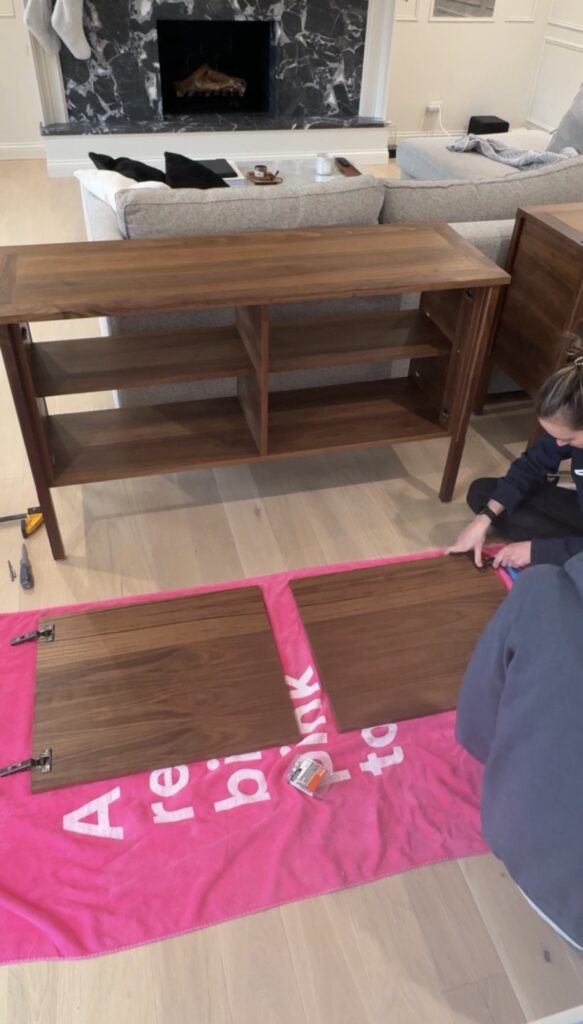
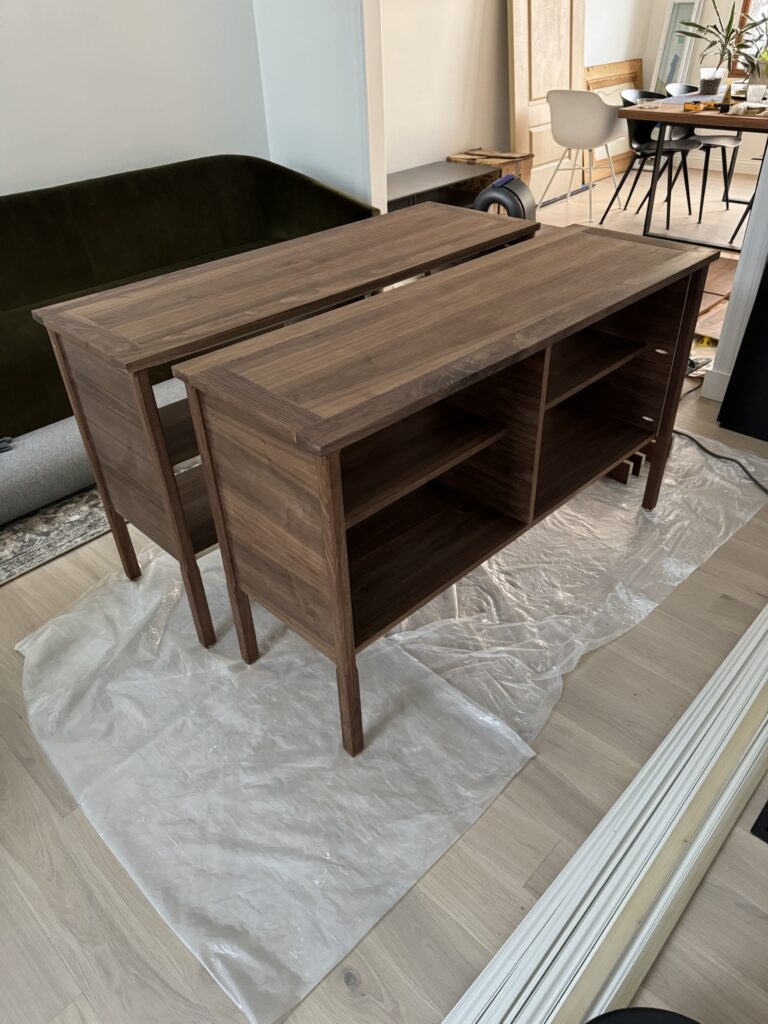
The final step is simply attached and adjusting the doors. This is a very nerve wracking step since you’re hoping all of your planning, measuring, and building worked out properly. Our cabinet doors hung without issue! With that, let’s enjoy a look at our completed walnut cabinets!
Our Finished DIY Walnut Storage Cabinets
We’re so happy with our final product! These walnut cabinets were intimidating to build because this was our first time building furniture ever. In the end, we got the final result we desired and for a total of $565 per cabinet. Not too bad right?! We have a full breakdown of cost at the end of this blog post.
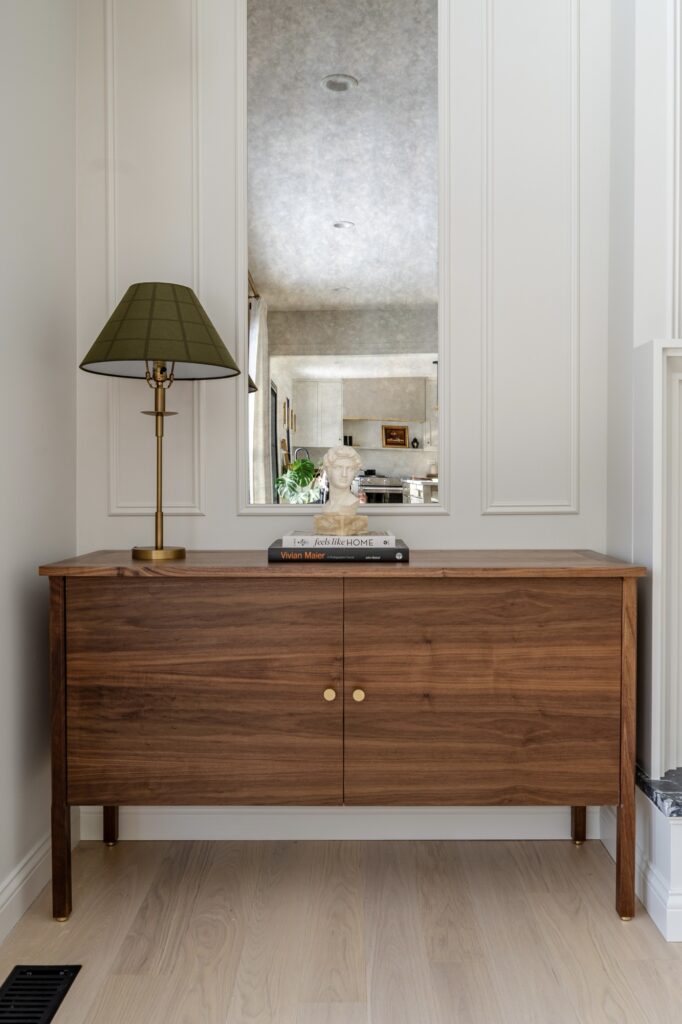
We finished off the cabinets with our favorite door hardware, the same knobs we used in our kitchen! We used the Portland Flat Top Knob in the finish Florentine Brass, use code “LKS” for 15% off your order.
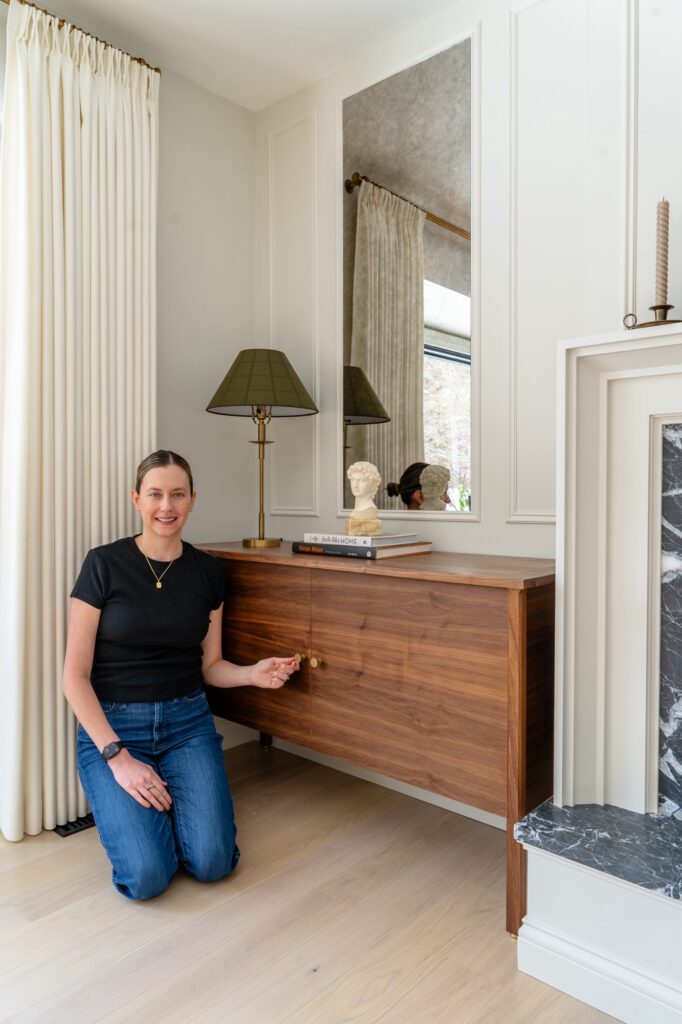
I love the warmth they bring to the fireplace wall! These DIY walnut storage cabinets were definitely the missing piece to completing our family room project.

All of the details worked out so well, like our walnut stair baluster legs and the solid walnut border around the cabinet top!
Cost Breakdown for a Single Cabinet
If you remember, our inspiration cabinet for this project cost $5,000 a cabinet! I still can’t get over that. Let’s take a look at what these DIY walnut storage cabinets ended up costing us to build:
- $325 – Walnut Plywood (both 3/4″ and 1/4″)
- $125 – Walnut Cabinet Legs
- $12 – Walnut Veneer Edge Banding
- $15 – Tung Oil
- $25 – Polycrylic
- $30 – Door Hinges & Mounting Plates
- $20 – Brass Feet
- $11 – Cabinet Knobs
- $565 TOTAL!
Although we wouldn’t consider $565 per cabinet “cheap”, I still consider that a great deal and I think in the end it was totally worth the DIY! We’re going to have these lovely cabinets for a long time.
Only One More Project Until Our Family Room is Complete!
We’re getting so close to completion, stay tuned for our next project and the final reveal! You can check out the full list of projects we’ve planned in our family room here.